Stud welding is a fast and efficient welding technique widely used in the construction industry. The process involves attaching a metal stud to a metal base by creating an arc between the two. This ensures that the stud is securely attached to the surface, making it ideal for projects where strength and durability are essential.
To use a stud welder, you must first prepare your materials by cleaning the surfaces you intend to join. Cleanliness is vital as it ensures that there is no contamination interfering with the weld’s quality. Next, select the right size of studs and ensure that they match your welding equipment’s capabilities. After this, load your studs onto the gun’s chuck and clamp it.
To create a secure bond between the stud and base material, carefully align your studs on top of each hole present in your base material. Then apply pressure on your welding gun’s trigger to create an electrical arc or resistance between them. Once done correctly, the melted part of both metals creates the molten pool that ultimately fuses with each other while resolidifying.
Interestingly, Alexander Golicich invented stud welding in 1930 while working at New York-based Plax Corporation Company; however, he never patented his technique publicly. Its effectiveness soon attracted other companies’ attention, leading to its wider adoption in various industries across America.
Get ready to stick it to the metal with the basics of stud welding.
Basics of Stud Welding
To understand the basics of stud welding with types of stud welding and equipment required for stud welding as solutions briefly. Dive deeper into the various types of stud welding and the necessary equipment needed to successfully execute the welding process with a stud welder.
Types of Stud Welding
Stud welding is a crucial process that offers many benefits. A key aspect of this process is understanding the different variations utilized. The following section provides an overview of varying stud welding approaches and their associated unique characteristics.
Types
| Method | Description |
| Drawn Arc | Utilizes an arc to melt base metal and attach fastener. |
| Capacitor Discharge | Electric charge melts fastener and attaches to base metal. |
| Short Cycle | Rapid warming process minimizes heat-affected-zone. |
It’s important to note that each variation is designed to be used in specific scenarios, so it’s imperative to select the right technique for optimal results.
Pro tip: Properly maintaining your weld equipment will ensure consistent and reliable performance.
Who needs Cupid’s arrow when you’ve got a stud welder and some metal to bond?
Equipment Required for Stud Welding
To perform stud welding, a specific set of equipment is required. This includes a stud welder machine, studs, collets, and clamping accessories. Each piece of equipment plays a crucial role in ensuring that the process runs smoothly and efficiently.
The following table shows the equipment required for stud welding:
| Equipment | Description |
|---|---|
| Stud Welder Machine | A machine that generates electrical current to create an arc between the base material and the stud. |
| Studs | Metal pins with one end designed to melt during the welding process; commonly made from steel, stainless steel or aluminum. |
| Collets | Adapters that hold the studs in place within the weld gun. |
| Clamping Accessories | Used for holding down the material being welded onto a surface for proper current passage between welding gun and base metal, such as magnetic holders or ground clips. |
It’s worth noting that different types of studs may require specific equipment.
In addition, it is recommended to use high-quality tools and accessories to ensure consistent and effective performance. Proper maintenance and safety measures should also be followed to avoid any unwanted incidents during operation.
To ensure successful stud welding outcomes, consider investing in reliable products from reputable brands, always using correct-sized parts specifically designed for each type of job. Furthermore, follow safety guidelines such as wearing protective gear at all times while using electrical devices.
Welding may require spark, but preparation is the real fire starter.
Preparing the Workpiece
To prepare the workpiece for stud welding, follow these steps: Cleaning the surface of the metal is crucial to ensure a strong bond. Also, choosing the correct stud for the job is important to ensure a successful weld. Let’s explore these two sub-sections in detail.
Cleaning the Surface
To ensure that the workpiece is perfectly prepared, it is important to pay attention to the cleaning process of its surface.
Here is a 4-step guide to effectively prepare the workpiece:
- Begin by inspecting the workpiece for any signs of dirt or grease.
- Use a clean cloth and mild detergent to wipe down the surface gently.
- Rinse it thoroughly with water and dry it well with a clean rag or air-dry it.
- Repeat steps 2-3 if necessary until you are satisfied with the surface cleanliness.
It’s crucial to note that different types of workpieces require specific types of cleaning solutions and techniques.
Interestingly, experts suggest using alcohol-based solvents on metal workpieces, while pottery tends to be more delicate and requires extra care during cleaning.
According to “Materials Today,” not cleaning your workpiece properly will reduce adhesive strength and lead to poor-quality results in downstream processes.
Finding the perfect stud can be tough, but not as tough as finding a decent date.
Choosing the Correct Stud
When it comes to selecting the appropriate stud, various factors come into play, including measurements, material type, and desired performance. Focusing on getting the right stud helps achieve optimal results.
- Understand requirements: Ascertain the project’s demands in terms of load capacity, thread fit class (tight or loose), overall purpose etc.
- Material: Pick a quality grade suitable for the workpiece material or find out which grades offer better performance for particular materials.
- Thread type and length: The joint type ‘tap-end’ requires the shank unthreaded from far end while ‘full length’ threads run over entire shank length.
- Matching fit class/thread direction for mating component helps sustain stress and resist forces acting on the joint.
It’s important to ensure correct choices aren’t just limited to a single criterion. Considering all applicable requirements yields durable workpieces. Always verify manufacturer’s recommendations about tailoring specific studs for individual projects.
Lastly, after choosing the correct stud, follow proper handling procedures like not exceeding torque-stress limits for maximum longevity and best use. Re-engaging fasteners can result in weak joints as do choosing an over-long fastener or cross-threading them during operation can cause problems too.
Get ready to spark things up with the stud welder, because this little machine is about to leave its mark.
Setting up the Stud Welder
To set up your stud welder for successful operation, you need to know how to adjust the welding parameters and take proper safety precautions. These sub-sections will help you achieve optimal welding results, while ensuring that you work safely and efficiently.
Adjusting the Welding Parameters
When it comes to making proper use of a welder, adjusting its parameters is of utmost importance. You need to master the art of tweaking these aspects so that the welding results are up to par with industry standards.
Below is a table containing some essential parameters you need to adjust for each specific type of stud welder:
| Parameters | Details |
|---|---|
| Welding Current | Determines the weld penetration depth. |
| Weld Time | Controls the duration of weld time. |
| Lift Time | Decides on the lift of gun between pins. |
| Gun Pressure | Controls gun pin pressure against base. |
It’s worth noting that a single parameter does not work alone – they dynamically affect one another, meaning you have to calibrate every parameter until you find your preferred setting.
Before recent technological advancements in stud welding technology, adjusting these parameters was a cumbersome task requiring loads of experience and dexterity. Nonetheless, this has changed over the years with more responsive models surfacing every other day as means to ensure efficient regulation while welding, hence perfect sequencing of all parameters.
Also, did you know that ergonomically adjustable welders were invented recently? These new models go beyond electricity adjustments and incorporate comfortable designs that prevent fatigue during long working hours! Because welding your hand to the wall is never a good look, let’s go over some safety precautions for using the stud welder.
Safety Precautions
When it comes to safeguarding yourself while setting up the stud welder, there are certain measures that need to be taken. Here are some guidelines that can assist you in staying secure:
- Ensure the space where you will be working is well-ventilated.
- Wear appropriate Personal Protective Equipment (PPE), such as protective glasses, earplugs, and clothing.
- Avoid standing near the welding arc or looking directly at it since this may damage your vision.
- Keep flammable materials away from the welding area to avoid fire hazards.
- Prior to beginning work with a stud welder, double-check all electrical connections for any signs of wear and tear or harm.
One more thing to keep in mind is that before starting work for any project, ensure that you have received proper training on how to operate a stud welder safely.
In addition, bear in mind that accidents can occur even when all necessary safety precautions have been taken. A friend of mine who was using a stud welder failed to check electrical connections thoroughly because he had grown overconfident after years of experience and ended up getting electrocuted. Hence, staying alert on the job every time is crucial no matter whether you’re a beginner or an expert.
Get ready to become a stud welding master with these step-by-step instructions – just don’t let it go to your head.
How to Use a Stud Welder
To use a stud welder effectively and efficiently while working on various metal sheets, mastering the basics of the process is necessary. Placing the stud on the workpiece and activating the welding gun can be challenging if you are a beginner. Hence, in this section of ‘How to Use a Stud Welder,’ we will go through both these sub-sections and explain them in detail.
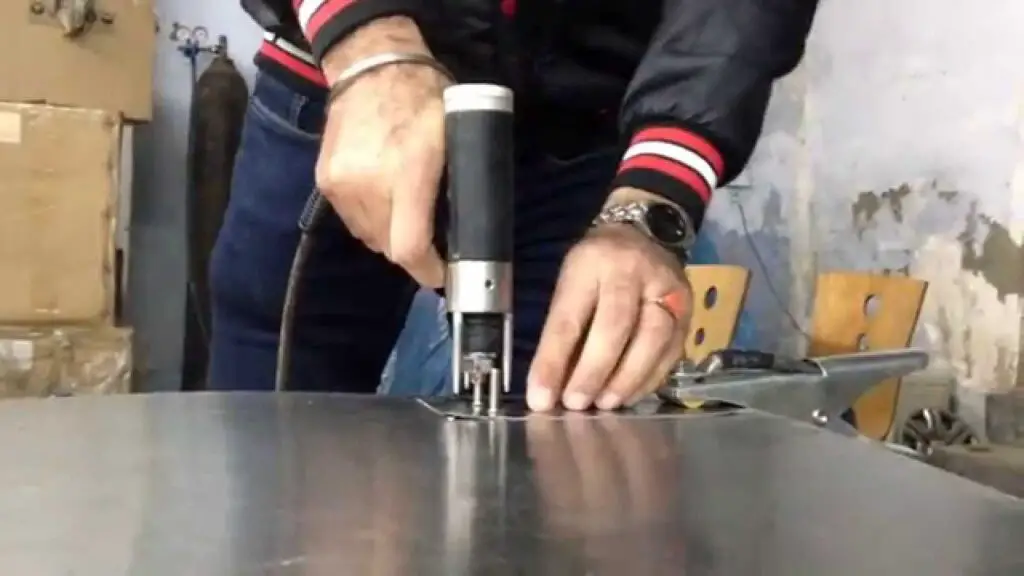
Placing the Stud on the Workpiece
To position the stud onto the workpiece, you must follow specific steps systematically. These steps ensure that your stud welder works effectively and efficiently.
- First, identify a suitable location where you want to place the stud.
- Clean the workpiece’s surface to ensure that there is no debris or dirt that will affect the welding process.
- Hold the stud in one hand and place it over the desired spot on the metal surface.
- Place your welding gun at a 90-degree angle over the top of the stud, ensuring that it rests firmly in place.
- Finally, activate your welding device using an initiating fire or trigger until you hear a beep sound. Release your welding gun once done.
Remember always to hold your studs in place with precision and avoid applying too much pressure as this may affect their positioning.
Pro Tip: Always wear protective equipment such as safety glasses and welding gloves when using your stud welder for added safety.
Get ready to make sparks fly and impress all your friends as you activate the welding gun like a boss.
Activating the Welding Gun
To initiate the stud welding process, the welding gun needs to be activated. Here’s a brief guide on how to do so.
- Ensure that your equipment is set up correctly and all safety measures are in place.
- Then turn on your welder power supply and adjust the settings according to the thickness of the metal sheet.
- Next, insert the stud into the gun chuck and connect it with a ceramic ferrule making sure it’s secured tightly.
- Once confirmed that everything is securely fitted, pull trigger of the gun to activate it.
It’s important to note that activating the welding gun may differ depending upon the type of stud welder being used. Therefore, always refer to instructions manual for detailed guidance before proceeding.
Pro Tip: Before initiating any welding activity, make sure you wear appropriate safety gear such as gloves and goggles to prevent accidents.
With your welding skills, you could single-handedly build a metal army to take over the world. Just don’t forget the post-welding steps!
Post-Welding
To ensure a seamless welding experience in ‘Post-Welding’ with ‘How to use a stud welder (Explained)’ and its ‘Checking the Quality of the Weld’ and ‘Removing the Welding Debris’ sub-sections, careful inspection and debris removal are necessary. These crucial steps can reveal imperfections and prevent any damage to your workpiece, ultimately leading to a successful welding project.
Checking the Quality of the Weld
Quality Assurance After Welding
After welding, it is crucial to check and ensure the quality of the weld to prevent any future damage. Quality assurance after welding ensures that the material used for the process can withstand its application requirements.
Here’s a 4-Step Guide to check the quality of the weld:
- Visual Inspection: Make visual observations like porosity, cracks, etc.
- Dye Penetrant Test: Applying dye to surfaces and observing penetration indicates flaws not visible through naked eyes.
- Magnetic Particle Inspection: Used in ferromagnetic materials to find invisible cracks.
- Ultrasonic Testing: High-frequency sound waves detect internal cracks or defects.
It is important not only to check but also document findings to simplify maintenance. Quality assurance ensures that all parts assembled meet predetermined standards.
Unique Details:
Before testing, perform a pre-cleaning process. High-standard equipment can be costly, so it’s vital to maintain them correctly. Avoid exposing any unprotected surface areas at your workplace during testing.
True History:
Boeing 777 was flying from Beijing to South Korea when it began shaking vigorously mid-flight due to an engine failure. Upon landing, experts found that there were multiple cracks in one of its Trent 800 engines’ welds. This accident emphasizes how integral post-welding procedures are for safe operation.
Cleaning up after welding is like playing Operation, except instead of a buzzer you get a face full of metal shavings.
Removing the Welding Debris
After finishing your welding task, you must dispose of the debris for a clean and safe work environment. Properly discarding the leftover slag, spatter and other residues will prevent accidents while allowing you to achieve precision in your subsequent projects.
To remove the welding debris, follow this five-step guide:
- Allow the metal to cool before cleaning out any remaining residue.
- Use a brush or scraper to remove any loose particles from the surface.
- Wash the surface using water and detergent or a specialized cleaning agent if necessary.
- Rinse the surface thoroughly with clean water and let it dry naturally or by using compressed air.
- Inspect for any leftover particles that need additional cleaning.
It is important to note that when cleaning up any welding debris, safety should be a top priority. Wear protective gear such as gloves and goggles when handling debris to avoid cuts and eye injuries.
A related aspect of removing welding debris is discarding the waste properly. Follow local regulations on disposing of hazardous materials like slag according to their corresponding code, and make sure residue bins are not overloaded as this may cause spills.
In one instance, an inexperienced welder failed to dispose of his welding debris correctly, causing an accident that led to severe burns. Therefore, taking extra precautions to handle debris safely and responsibly is paramount in preventing costly hazards.
Looks like the stud welder needs some therapy, because it’s having trouble getting attached.
Troubleshooting the Stud Welder
To troubleshoot your stud welder efficiently with the help of ‘Common Issues and Solutions’ as a solution, you need to understand the possible problems that can arise while using a stud welder. This section will introduce you to the common issues that can occur with your stud welder and how you can solve them.
Common Issues and Solutions
Stud welding is a critical process in the construction and manufacturing industries. However, sometimes, it may face technical difficulties that need troubleshooting. Here are several issues and solutions for stud welding:
- Difficulty starting the arc – Clean the grounding surface, sharpen the tungsten electrode, or adjust power settings.
- Burn through of the base metal – Reduce amperage or increase tip size.
- Inconsistent weld quality – Adjust time, pressure, power or remove any debris from studs.
- Noise during welding – Inspect insulation around cables or check contacts for corrosion.
- Poor contact with material surface – Check grounding device or improve surface cleaning.
- Irregular stud location placement – Use positional guides to avoid deviations from intended locations.
Notably, familiarizing yourself with the tool’s user manual will help you prevent and solve other issues that arise when using it.
It is essential to note that though most of these troubleshooting methods may work independently, a poorly-maintained machine may require professional aid.
According to B&D Stud Welding, over 95% of all ironworkers rely on stud welding grips as their primary attachment mode.
Remember to follow safety protocols and be cautious when troubleshooting technical difficulties in your stud welder.
Remember, when it comes to stud welding, a little spark can go a long way – just don’t go setting off any alarms!
Conclusion: Tips for Successful Stud Welding
Stud Welding: Tips for Successful Execution
You must follow certain tips for successful stud welding execution:
- Make sure you choose the right equipment and supplies before beginning the welding process.
- Prepare the surface area where you plan to place the stud by cleaning it of any debris or dirt.
- Use a properly sized weld stud and ensure that it is securely fastened in place before starting the welding process.
- Weld through quick and steady tapping motions, ensuring that you don’t apply too much heat or pressure at once.
It is also essential to note that proper weld quality inspection is critical to guarantee a reliable connection. Accurate measurements, inspections, and assessments are crucial factors to ensure precise welds.
Stud Welding Techniques: An Effective Method
Stud welding techniques allow welders to connect different types of metal effectively. By using this method, we can attach weld studs and fasteners quickly without damaging the material’s base. This technique is popular in construction, automotive industries due to its efficiency and durability.
A true fact: According to AWS D1.1 Structural Welding Code – Steel, Stud welding has an advantage over conventional welding because it requires less time and does not burn through the metal being welded.
Frequently Asked Questions
What is a stud welder and how does it work?
A stud welder is a tool used to fasten metal studs or bolts to a metal base. It works by creating an arc of electricity between the stud and the base, melting both metals. The melted metals are quickly fused together when pressure is applied to the stud, creating a strong bond.
How do I prepare the surface before using a stud welder?
The surface should be clean and free of any debris, rust, or paint. Use a wire brush or sanding disc to remove any rust or paint, and wipe the surface with a clean cloth to remove any dust or debris. The surface should also be dry before welding.
What should I wear when using a stud welder?
You should wear protective clothing, including heavy-duty gloves, a welding mask, and safety glasses. Welding can produce sparks and hot debris, so it’s important to protect your skin and eyes.
What size studs can be used with a stud welder?
The size of the studs depends on the capacity of the stud welder. Generally, stud welders can handle studs ranging in size from 3/16 inch to 1 inch in diameter.
How do I control the heat and duration of the arc?
Most stud welders have adjustable settings for heat and duration. Consult the owner’s manual or contact the manufacturer for specific instructions on how to adjust the settings based on the metal type, stud size, and thickness of the base material.
Can I use a stud welder on non-metal materials?
No, stud welders are designed to be used only on metal surfaces. Attempting to weld studs onto non-metal materials can result in damage to the material and the welder.

Paul Dixon is a certified welder with a wealth of experience in welding and related technologies. He started his career as an apprenticeship in welding, where he learned the ropes and acquired extensive skills in the craft.
Over the years, Paul has continued to sharpen his expertise, earning him top-rated welding certification. He remains one of the most outstanding welders in the industry.