Hooking up your stick welding leads is a task that can be quite complicated. should you connect the ground lead to one of two different terminals on the welder? Where do they go, and how does it all work together once hooked up properly in order for things not get too messy or tangled.
People have a hard time understanding the connections of stick welders. But when I figured it all out, they weren’t as complex as one might think.
The three most common ways to connect the welding leads are DCEN, DCEP and AC. They all have their pros and cons which should be considered when deciding on which one will work best for your application based off of what you need from it!
Stick welding Arc Welding
The most popular form of arc welding is Shielded Metal ARC Welding. It uses electrical current (usually DC) and melts the metal work piece with an electrode rod, forming a weld pool that’s covered by flux to protect it from contamination by foreign particles; this process creates strong bonds between metals without melting too much or heating up too much which means less chance for problems later on downline.
Setup of Stick welding Equipment
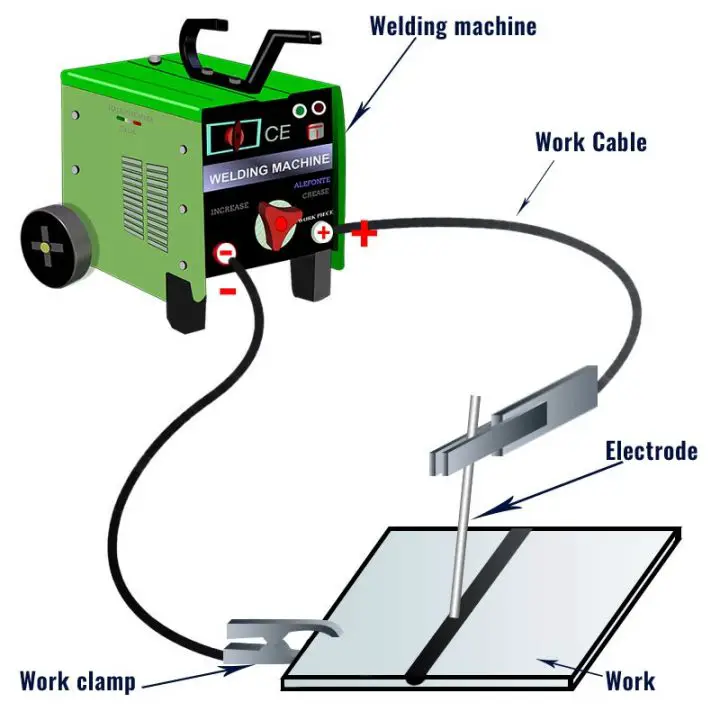
Stick welding setup consists of the following equipment:
- A welding machine
- Welding leads (Work Cables)
- Electrode holder
- Ground clamp (Work Clamp)
- Welding rod (Electrode)
The picture below shows these components in their proper arrangement.
What are the Different leads and cables on a Stick welder?
Welding leads or welding cables are flexible electrical conductors wrapped in an insulating rubber jacket. They come with different diameter and length, depending on your application needs since high current applications require large ones for less resistance to flow through while low currents can be handled by smaller counterparts that offer more flexibility but slower speed of transmission so they’re better suited toward delicate work where quick turns aren’t required.
In stick welding, there are two different types of leads, an electrode lead and a work lead. The former connects your machine to the holder where metal ions will be found, similarly this connection occurs through ground contacts on either side for connecting it with other equipment such as pieces or arms during fabrication processes.
How to Determine welding Lead sizes.
If you’re hooking up stick welding leads, make sure they’re the right size. If not and your current or voltage is too low for an arc to form between them meaning problems like excessive spatter could occur as well as fusion being insufficiently hot enough when welding iron alloys (which often cause welds with high tendency for cracking).
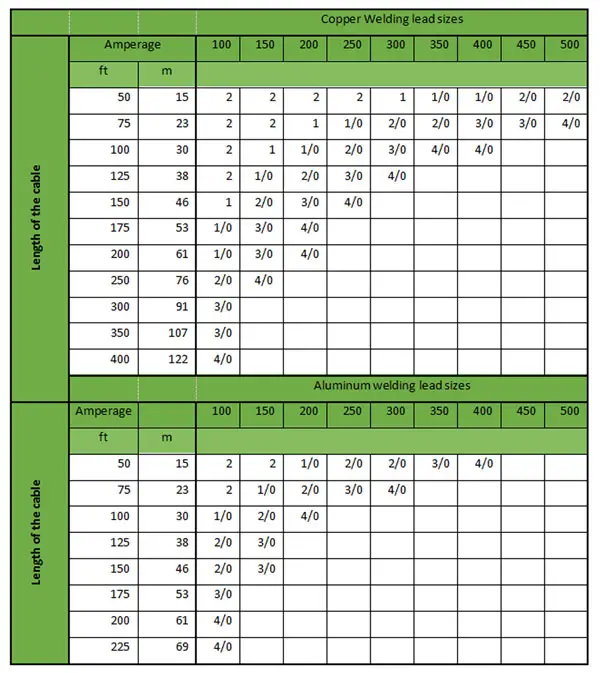
The following table shows the correct size of copper and aluminum cables for different stick welding amperage values and lengths of the welding cables.
Procedure to set up a stick welder lead
To properly connect the stick welding leads, just follow these simple steps.
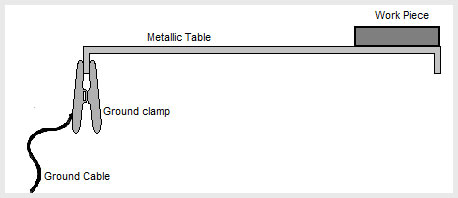
1. Placement of Ground clamp
First of all, attach the ground clamp at its appropriate position.The ground clamp connects our workpiece to the ground via the work lead. You can either clip it directly to the workpiece or to the metallic table on which your work is to be done.
2. Hook up welding leads to welder
Make sure you connect the work lead to a negative terminal and electrode cable with positive terminal. You can also make connections opposite this depending on what type of welding application is being used for that particular project or job.
Some welding machines have a switch that can be flipped to change the polarity. Otherwise, you’ll need to manually exchange connections of cables and make sure device is turned off before switching poles on your machine or else risk frying whatever’s near it with electricity.
3. Next Plug-in the welding machine
plug in the machine and switch it on. Set it to the appropriate current and voltage settings as per your welding job specs and You are good to go.
3 types of welding setups: DCEP, DCEN, and AC
For stick welding, there are three different ways that you can connect the cables. All of them have their own advantages and disadvantages so it’s important to know what method will work best for your application.
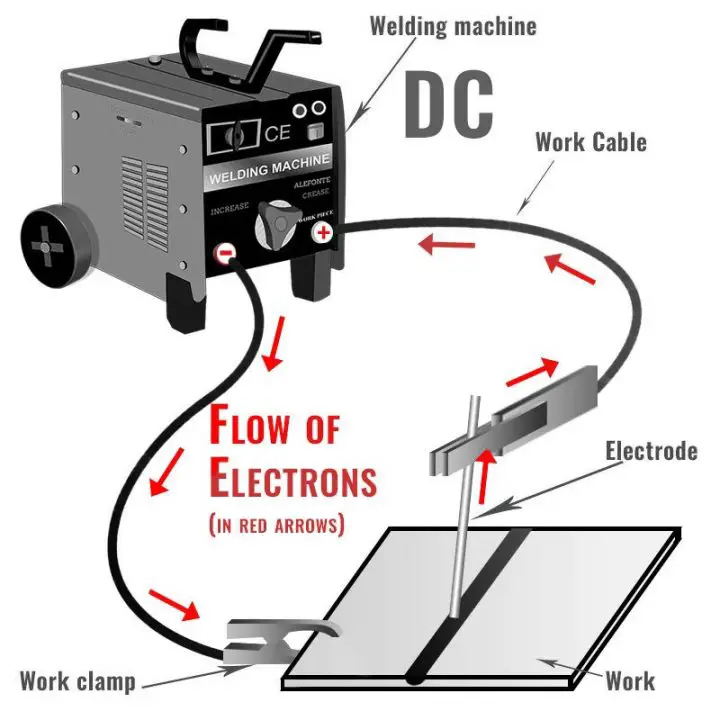
1. DCEP welding connection
For DCEP or direct current electrode positive connection (formerly known as reverse polarity), you have to connect the holder with an attached ground clamp onto one end of your power source. As a result, electrons will flow from our workpiece towards this metal plate and create voltage difference between them, for most stick welding applications, we use the DCEP setup.
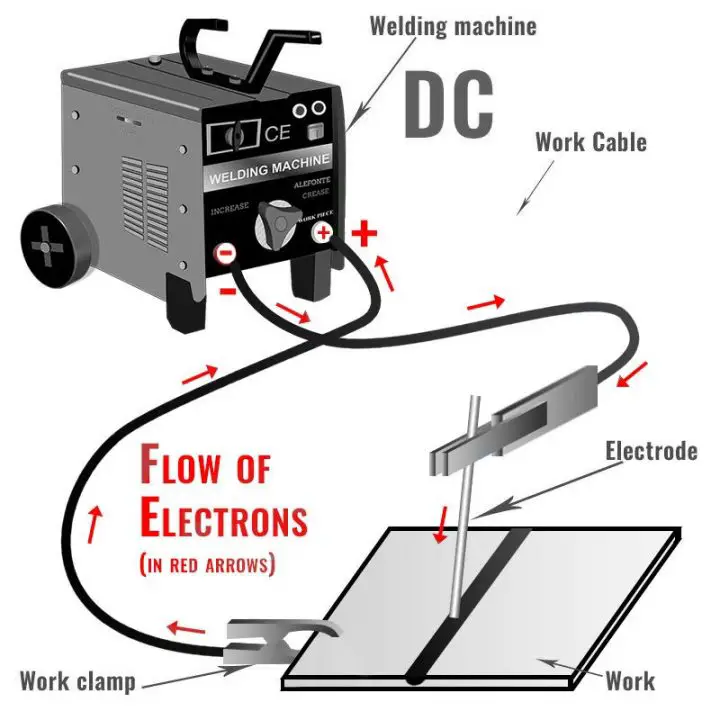
2. DCEN welding connection
The Setup Diagram for DCEN or Direct Current Electrode Negative shows that the holder is negative and works with a positive object. Hence, electricity will flow from one end to another as shown in this figure’s setup arrangement electron flow towards Positive polarity!
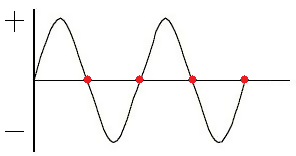
3. AC connection
The AC welding connection has no polarity, which means that it’s an even heat transfer from the electrode to workpiece. It does this by switching current direction every 120th part of a second and so there is nothing for you to worry about when using one! The following diagram shows how this setup works.

DCEN vs DCEP: What polarity should you stick weld on?
Though it is quite versatile in terms of polarity, stick welding can be done mostly with DCEP connections.
welding with DCEP is more complicated than DCEN because once the current leaves the surface of one piece metal and moves towards an electrode, it takes enough energy for electrons to jump across this small distance. As these fast moving particles collide with their respective targets (both sides being positive), they produce heat which accounts two thirds in total obtained through welding process.On the contrary, for DCEN, two-thirds of the heat is formed on the metal being welded because the electrons flow from the electrode towards the base metal.
You cannot just randomly choose any welding setup. Each connection has its applications and limitations, much like the electrodes themselves do not work with both DCEP or DCEN connections.
DCEP produces a high level of heat on its electrodes which results in deep penetration. However, since the rate at which they are deposited is low compared to DCEN it isn’t suitable for welding thin sheets that may cause them break up or rupture during production process.
DCEN connections have less heat on the electrode which provides a smooth surface for welding. The filler metal deposition rate is also much lower than DCEP, so if you need to weld thin sheets it would be best to use DCEN.
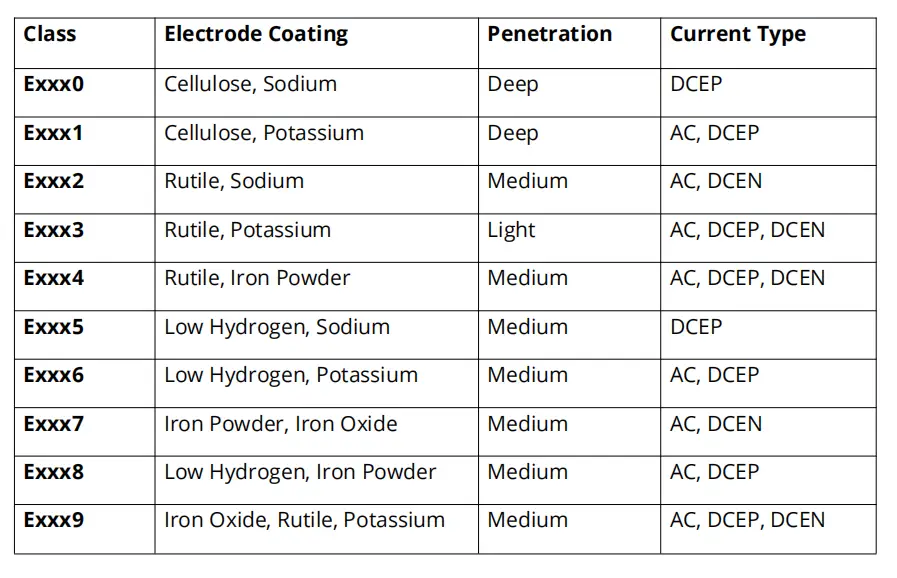
Different Electrode Selection’s for polarities
Different current types require different electrodes. Some are best for DC and others are better with AC, depending on the materials used to coat them.For a given application it’s important to choose an electrode that will work well in both directions so as not create high voltages at any point during use, the following table might come in handy.
Arc cleaning action in DCEP
One of the main advantages of DCEP over DCEN is its oxide cleaning action.
arc welding is a great way to weld two pieces of metal together but it’s important not only for the integrity of your weld, you must also clean off any dirt or rust from before hand. Otherwise those impurities will mix with molten pools and result in an imperfection.
In DCEP, the avalanche of electrons moves from base metal towards positive electrode. This breaks non-conducting oxide layer in a piece and inherently removes all contaminates resulting in strong weld.
DC Welding vs AC welding
DC is the preferred power source for most high powered machines. Some, like TIG welders can run on both AC and DC but why would you ever need to use an alternative? If we are using 90% or more of our time with direct current then why wouldn’t it make sense just buy getting any type of welding machine that works best?
DC welding has a smoother appearance than AC. In this example, each time current switches from positive to negative there is no airflow and so the arc formed will be much more regular in shape with less chance of denomination.
Some welders prefer to work with AC because it eliminates arc blow. Welds that are crooked or have too much spatter can be corrected by switching over to a different type of welding machine, but DC has more advantages than its counterpart in this case as well.
Stick Welding Troubleshooting for Welding Leads
To avoid any welding cable problems like small output current, high resistance and difficulty in starting arc there are few things you need to keep an eye on. First of all make sure that your TIG welder has been set up correctly by manufacturer’s specifications before using it for the first time as these settings might vary between machines so check them carefully against what is shown below:
As well as ensuring correct voltage drop across load (around 18 volts), which will affect how much power can safely propel through metal during fusion process without heating either side too quickly.
Afew tips to look out for:
- Straighten the cables.
- Make sure there are no bends or coils in the cable as it can cause inductance effects in the wires.
- Lower quality cables can cause arc starting problems. Use high-quality cables.
- Use the welding leads of proper size. See the table provided above in this article.
Summary
When welding, always remember that the electrode is connected to DCEP and ground in a power situation. It’s also important when hooking up your leads not only be cautious but exercise extreme caution since there are sparks flying everywhere.
When you have the wrong cable connections, your welder might not work properly. This can lead to poor penetration or even arc blow problems! But once this is fixed everything should be just fine.

Paul Dixon is a certified welder with a wealth of experience in welding and related technologies. He started his career as an apprenticeship in welding, where he learned the ropes and acquired extensive skills in the craft.
Over the years, Paul has continued to sharpen his expertise, earning him top-rated welding certification. He remains one of the most outstanding welders in the industry.
-
Paul Dixonhttp://beststudwelders.com/author/beststudwelders1990/
-
Paul Dixonhttp://beststudwelders.com/author/beststudwelders1990/
-
Paul Dixonhttp://beststudwelders.com/author/beststudwelders1990/
-
Paul Dixonhttp://beststudwelders.com/author/beststudwelders1990/